Digitizing Embroidery Designs: Tools, Tips, and Techniques
Introduction
Embroidery has come a long way from traditional hand-stitched methods to modern digitized designs. With the rise of digitizing embroidery designs, creating intricate and professional-quality designs has become more accessible than ever. But what exactly is digitizing embroidery? Simply put, it's the process of converting artwork or designs into a digital format that embroidery machines can read and stitch. This process requires the right tools, a set of skills, and some helpful techniques to ensure stunning results. Whether you're a seasoned professional or just starting out, this guide on digitizing embroidery designs will help you navigate the essentials.
What Does Digitizing Embroidery Designs Involve?
Digitizing embroidery designs is the bridge between your creative ideas and the final stitched product. It involves using specialized software to translate a graphic, logo, or digitized logo into a series of instructions that an embroidery machine can follow. These instructions dictate how the design is stitched, including aspects like stitch type, density, direction, and color sequence.
The digitizing process ensures that every detail of the design is accurately represented in thread form, whether it's a complex pattern or a simple digitized logo for branding. The ultimate goal is to create a file format compatible with embroidery machines, such as .DST, .EXP, or .PES.
Why Is Digitizing Embroidery Designs Important?
-
Precision: Manual embroidery can’t always achieve the precision required for logos or intricate designs. Digitizing ensures accuracy down to the smallest detail.
-
Efficiency: Digitized designs save time, especially for bulk orders.
-
Consistency: Whether you’re producing one item or a thousand, digitizing ensures each piece looks identical.
Essential Tools for Digitizing Embroidery Designs
To get started with digitizing embroidery designs, you need a few key tools:
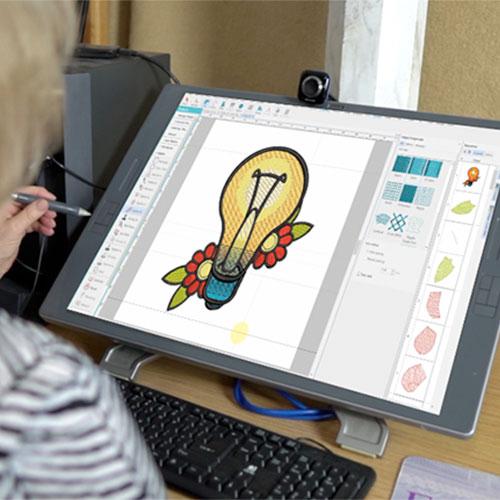
1. Embroidery Digitizing Software
The most critical tool in your arsenal is the software. There are many options available, each with unique features:
-
Wilcom: Known for its advanced features and user-friendly interface, Wilcom is a top choice for professionals.
-
Hatch: Ideal for both beginners and experts, Hatch offers comprehensive tools for creating and editing designs.
-
Embird: A budget-friendly option with a wide range of features.
-
Brother PE-Design: Perfect for those using Brother embroidery machines, this software ensures seamless compatibility.
2. A Reliable Computer
Your computer must be powerful enough to handle the embroidery software. Look for these specs:
-
Processor: At least Intel Core i5 or equivalent.
-
RAM: 8GB or more for smooth performance.
-
Storage: Sufficient space to save multiple designs.
3. Graphics Tablet (Optional)
For detailed work, a graphics tablet can make it easier to draw or trace designs with precision.
4. Embroidery Machine
Of course, you'll need a compatible embroidery machine to bring your designs to life. Popular brands include Brother, Janome, and Bernina.
Steps to Digitizing Embroidery Designs
Step 1: Prepare the Artwork
Start by selecting or creating the artwork you want to digitize. Make sure it's in a high-resolution format, such as .PNG, .JPEG, or .SVG. Clean up any unnecessary details that may complicate the stitching process.
Step 2: Import the Artwork into Software
Upload your artwork into your chosen digitizing software. Most programs allow you to adjust the size and orientation to fit your project requirements.
Step 3: Choose Stitch Types
Select appropriate stitch types for different parts of the design:
-
Running Stitch: Ideal for outlines and fine details.
-
Satin Stitch: Commonly used for text and borders.
-
Fill Stitch: Best for larger areas or backgrounds.
Step 4: Set Stitch Directions and Density
Adjust the direction and density of stitches to enhance the design’s appearance and durability. Too dense, and the fabric may pucker; too sparse, and the design may lack definition.
Step 5: Add Underlay Stitches
Underlay stitches act as a foundation, stabilizing the fabric and preventing distortion. This step is crucial for clean and professional results.
Step 6: Assign Colors
Assign thread colors to different parts of the design. Most software allows you to match colors with specific thread brands.
Step 7: Save and Export
Once the design is complete, save it in the appropriate format for your embroidery machine. Test the file by stitching it on a sample fabric before starting your final project.
Tips for Successful Embroidery Digitizing
1. Start Simple
If you’re a beginner, practice with simple designs before tackling complex logos or detailed artwork.
2. Understand Fabric Types
Different fabrics require different approaches. For example:
-
Stretchy fabrics may need stabilizers.
-
Dense fabrics might require less stitch density.
3. Test Your Designs
Always stitch a sample before production. This helps identify and correct issues like puckering or incorrect stitch density.
4. Keep Learning
Stay updated with the latest software features and industry trends. Many software providers offer tutorials and webinars to improve your skills.
Common Challenges and How to Overcome Them
Puckering
Cause: Excessive stitch density or lack of stabilization. Solution: Reduce stitch density and use appropriate stabilizers.
Thread Breakage
Cause: Poor thread quality or incorrect tension settings. Solution: Use high-quality threads and adjust machine tension as needed.
Misalignment
Cause: Improper hooping or fabric movement. Solution: Ensure the fabric is securely hooped and consider using adhesive stabilizers for extra support.
Advanced Techniques in Embroidery Digitizing
Appliqué
This technique involves sewing fabric pieces onto a base fabric to create designs. It’s a great way to add texture and color contrast.
3D Puff Embroidery
Used for creating raised designs, 3D puff embroidery adds depth and a unique aesthetic. This is commonly seen in hats and caps.
Gradient Stitching
Achieve a gradient effect by varying stitch density and color transitions. This technique is perfect for adding a modern touch to designs.
Conclusion
Digitizing embroidery designs is a blend of art and technology. With the right tools, techniques, and practice, anyone can create stunning embroidery pieces that stand out. Whether you’re working on a personal project, crafting a digitize logo for embroidery, or fulfilling client orders, mastering digitizing will elevate your embroidery game.
A digitized logo for embroidery ensures that branding and designs translate seamlessly onto fabric, maintaining precision and quality. Remember to start simple, test your designs, and keep refining your skills to achieve professional results. Happy stitching!
We are excited to announce the **launch of the Sharkbow Marketplace!** 🎉 Now you can:
- 🛍️ List and sell your products – Open your own store easily.
- 📦 Manage orders effortlessly – Track sales and communicate with buyers.
- 🚀 Reach thousands of buyers – Expand your business with ease.
Start selling today and grow your online business on Sharkbow! 🛒
Open Your Store 🚀 ✖🚀 What Can You Do on Sharkbow?
Sharkbow.com gives you endless possibilities! Explore these powerful features and start creating today:
- 📝 Create Posts – Share your thoughts with the world.
- 🎬 Create Reels – Short videos that capture big moments.
- 📺 Create Watch Videos – Upload long-form content for your audience.
- 📝 Write Blogs – Share stories, insights, and experiences.
- 🛍️ Sell Products – Launch and manage your online store.
- 📣 Create Pages – Build your brand, business, or project.
- 🎉 Create Events – Plan and promote your upcoming events.
- 👥 Create Groups – Connect and build communities.
- ⏳ Create Stories – Share 24-hour disappearing updates.
Join Sharkbow today and make the most out of these features! 🚀
Start Creating Now 🚀